RCS Setup with Twilio
This guide explains how to create an RCS Sender in Twilio and share access with Alvio.
Before you start
- A paid Twilio account (console.twilio.com (opens in a new tab))
- Brand assets: logo, banner, privacy policy URL, and terms of service URL
- Carrier approval can take several weeks — start early if you have a launch date
1. Create an RCS Sender
- Log in to the Twilio Console (opens in a new tab).
- In the left menu, open Numbers & senders > Overview.
- Open the RCS tab.
- Click Create new sender.
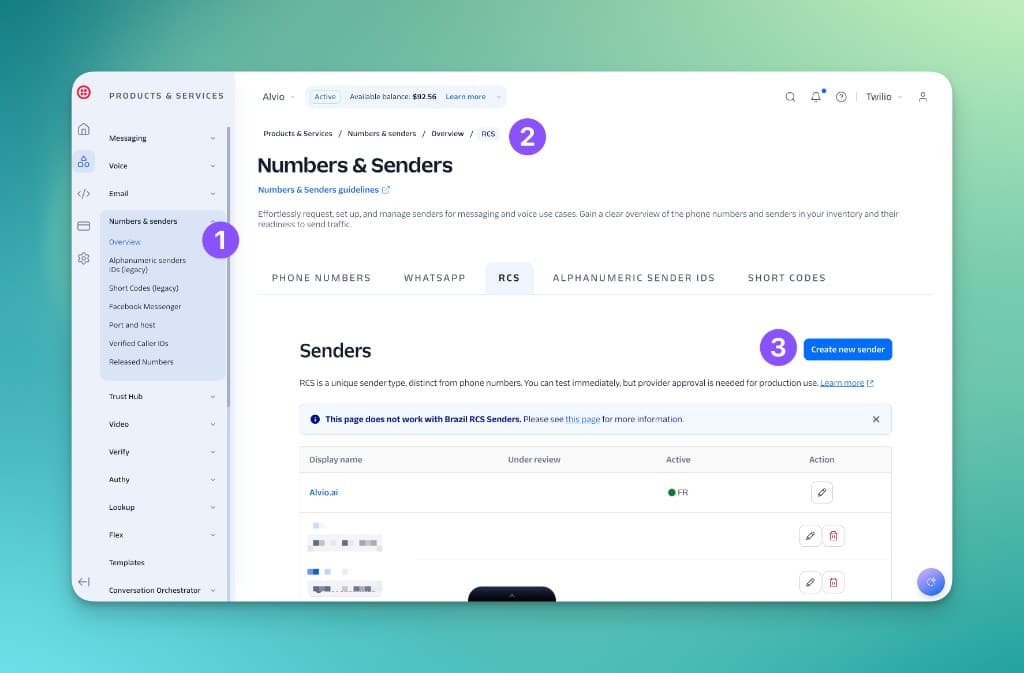
- Enter your display name (the brand name users will see), accept the terms, and continue.
- Fill in the brand profile Twilio asks for (description, logo, banner, accent color, contact details, privacy policy, and terms of service).
- Save the sender. You can add a test device later if you want to try messages before approval.
2. Submit for carrier approval
- Open your RCS Sender → Compliance registration.
- Select the countries where you want RCS.
- Complete the registration form (business details, opt-in / opt-out, use case).
- Submit and wait until at least one carrier shows as Active for your region.
3. Add the sender to a Messaging Service
Alvio sends through a Twilio Messaging Service, so the RCS Sender must be in its sender pool.
- Go to Messaging > Services and create a service (or open an existing one for Alvio).
- Add your RCS Sender to the Sender Pool.
- (Recommended) Also add an SMS number for fallback when RCS is unavailable.
- Copy the Messaging Service SID (
MG…).
4. Give Alvio access
Use one of the options below once the sender is approved and in a Messaging Service.
Option A — Share credentials securely
Send these values to Alvio via a secure channel (password manager share, encrypted note — not plain email if possible):
| Value | Format |
|---|---|
| Account SID | AC… |
| Auth Token (primary) | from Account Info in the Console |
| Messaging Service SID | MG… |
| RCS Sender ID | rcs:… |
The Auth Token grants full API access. Prefer a dedicated Twilio subaccount for Alvio / RCS when possible.
Option B — Invite Alvio as Console admin
- Ask your Alvio contact for the email to invite.
- Go to Account > Manage users (or Organization settings > User management).
- Invite that email with the Administrator role on the account that owns the RCS Sender.
- Tell your Alvio contact once the invite is accepted.
With admin access, Alvio can complete the integration without you copying secrets.
Summary
- Create the RCS Sender in Twilio.
- Submit compliance registration and wait for approval.
- Add it to a Messaging Service.
- Share credentials or invite Alvio as admin.
Alvio handles the rest.
Need help? Contact our support team for assistance with your Twilio RCS setup.